
- Published on
Real-time data streaming using Apache Flink and Kafka
- Authors
- Name
This article is split into 2 parts:
- The first part is an introduction to
Apache Flinkand its key concepts. - The second part is a step-by-step guide on how to build a simple Apache Flink application that reads data from Kafka topics, does some manipulations, and writes the result to another Kafka topic.
Table of contents
Introduction
You may heard about the statement that data is the new gold, this is actually true. Data is a valuable resource to any company, without data it's hard to make informed decisions and stay competitive in the market. That's why we see a lot of companies running after data, investing in data collection, storage, and processing.
What we are interested in here is the processing part of the data, where we take the data, do some manipulations, and extract insights from it.
Type of data processing
There are 2 types of data processing:
- Batch processing: where data is processed in large volumes at once.
- Stream processing: where data is processed in real-time as it arrives.
Our demo is a simple application that simulate stock's prices update in real-time by reading data from Kafka, doing some manipulations (filtering & joining), and writing the result to another Kafka topic.
Application overview
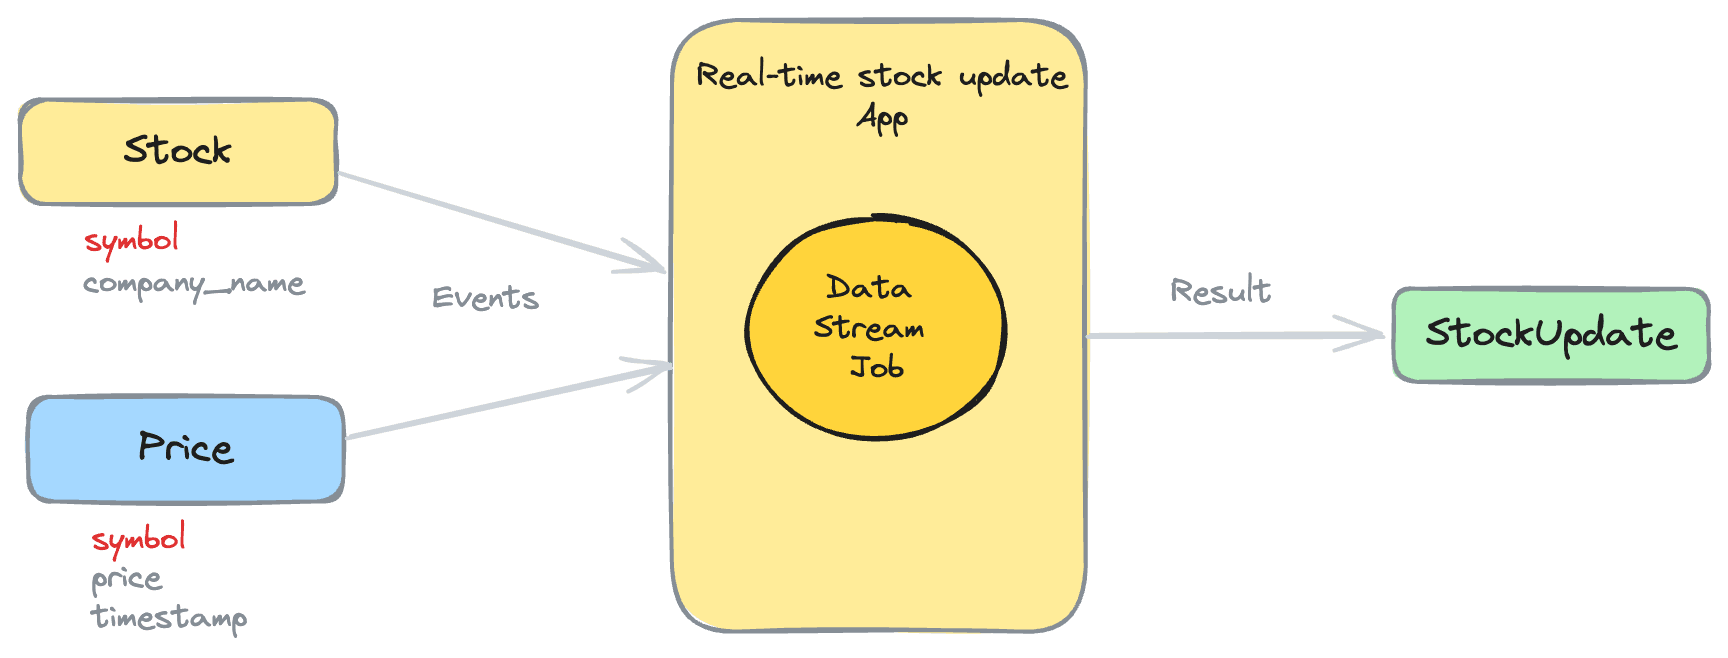
Our application will be built using Apache Flink and Apache Kafka, two powerful tools that are widely used for stream processing applications.
Please note that there are some alternatives to Apache Flink, such as
Kafka Streams,Apache Storm,Apache Spark Stream, etc.
Source code of the demo
As usual, you will find the source code of the demo in this repository.
Apache Flink
Apache Flink is a powerful stream-processing framework that can be used to process real-time data streams. It provides a high-level API for building stream processing applications and supports a wide range of use cases, including event-driven applications, real-time analytics, and machine learning.
So let's start by understanding the basic concepts of Apache Flink (please note that this is not an exhaustive list of concepts, but rather a high-level overview of the key concepts).
Flink job overview
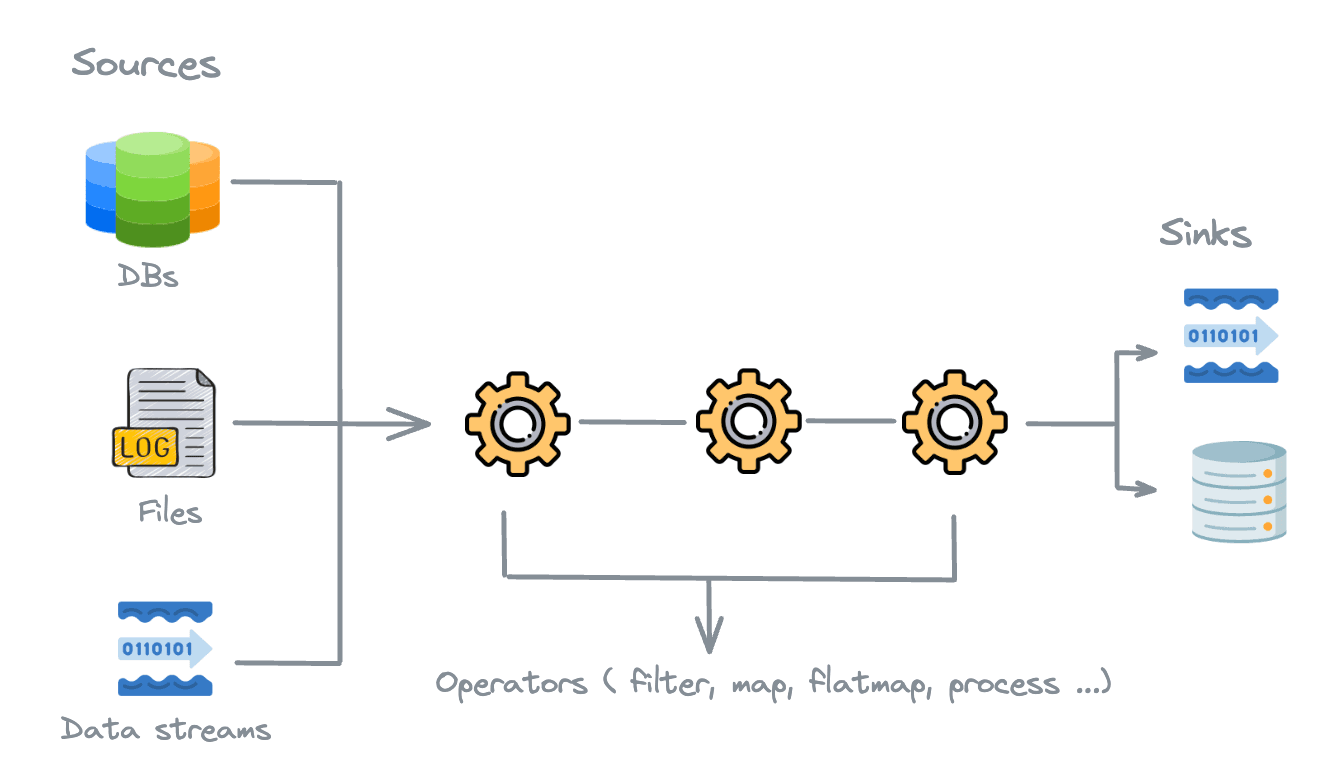
A Flink job is a program that processes data streams using the Flink framework. A Flink job consists of several components, such as:
- Sources: Sources are the entry points of the job, where the data is read from external systems such as Kafka, S3, Files, Databases, etc. these data are then converted into a stream of events that can be processed by the job.
- Operators: Operators are the processing units of the job where we can perform transformations on the input data, such as filtering, joining, mapping and aggregating. Flink have a wide range of built-in operators that can be used easily.
- Sinks: Sinks are the final endpoints of the job, where the processed data is written to external systems such as Kafka, S3, Files, Databases, etc.
A Flink job is executed by the Flink runtime, which manages the execution of the job and coordinates the processing of the data streams. The Flink runtime is responsible for distributing the job across multiple nodes in a cluster, managing the state of the job, and handling failures.
Flink runtime/architecture
Flink provides a distributed stream processing architecture that can be used to process large volumes of data in real-time. Flink doesn't comes with a built-in cluster manager, so you can use any cluster manager that supports Apache Flink, such as Apache Mesos, Kubernetes, or Apache YARN. You can also run Flink in standalone mode.
The architecture of Flink consists of several components that work together to process data streams, such as:
- The
Dispathcerwhich is the entry point of the cluster that receives the job submission requests and forwards them to theJobManager. - The
JobManagerwhich is the central part of the cluster that takes in charge the coordination of the job execution - The
ResourceManagerwhich is responsible for managing the resources of the cluster and allocating resources to the jobs. - The
TaskManager(workers) which is responsible for executing the tasks of the job. We can have multiple TaskManagers in a cluster to distribute the load of the job execution.
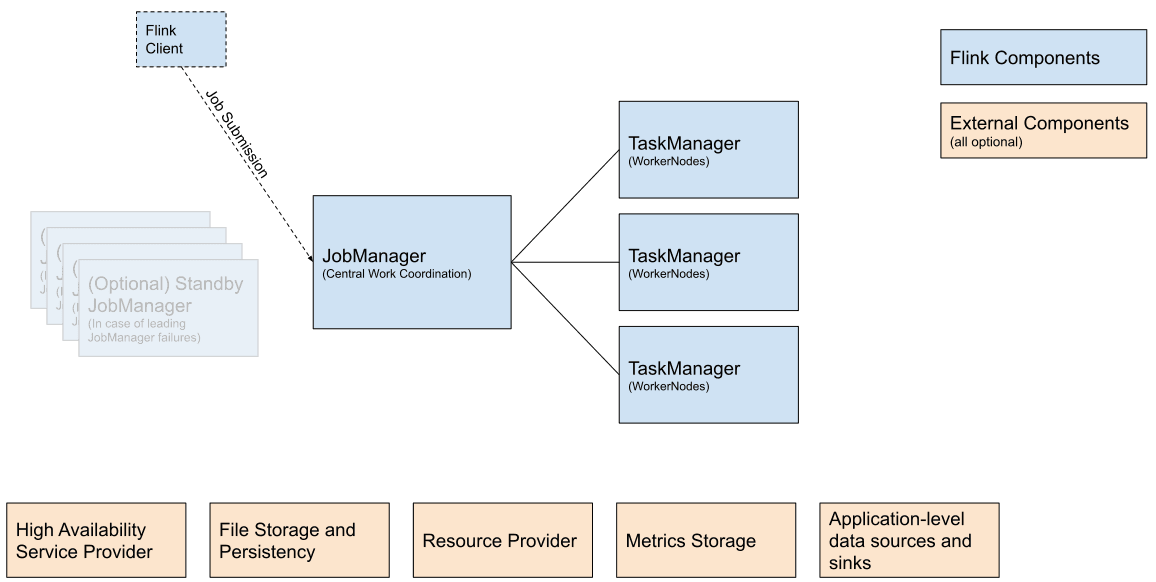 (source: Flink documentation)
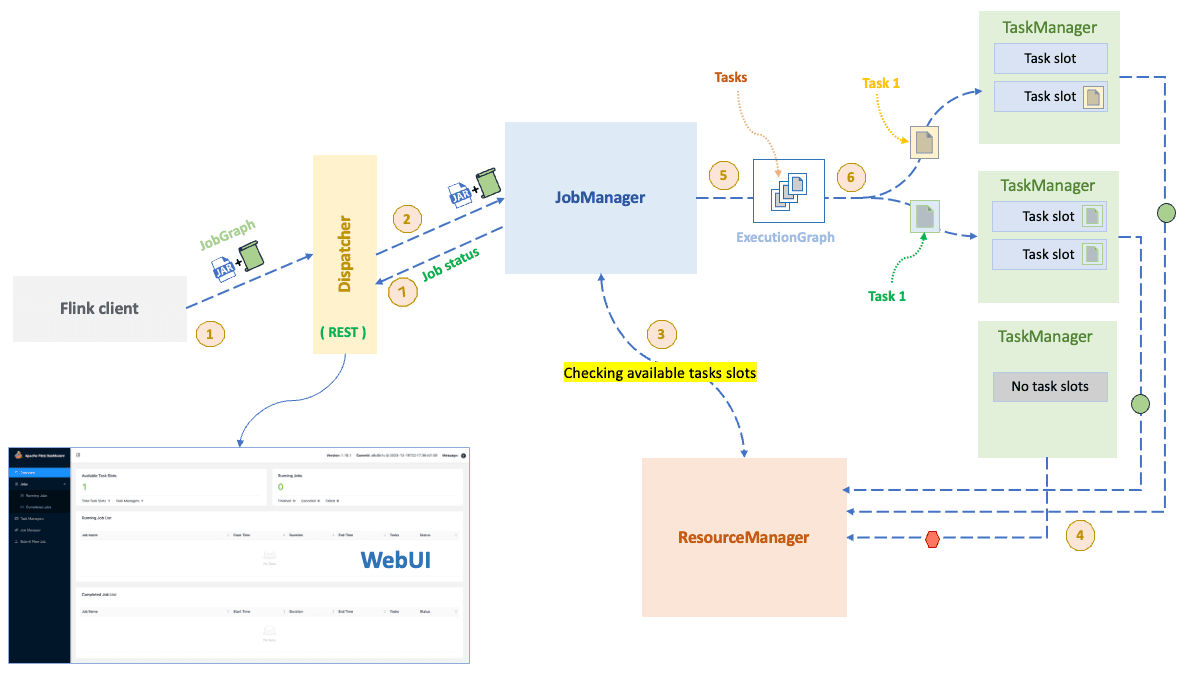
How does it work?
- The
Flink clientgenerates 2 things:- A
JobGraphwhich represents alogical dataflowof the application (as it's name suggets dataflow describes how data will flows between operations) . - A
JARfile that contains the code of the application.
- A
- The
Flink clientsubmits theJobGraph+ theJARfile toJobManagerthrough theDispatchercomponent that acts as a gateway by exposing the REST API for job submission and providing a web interface for monitoring. - The
JobManagerfirstly checks if the there is enough resources to execute the job by communicating with theResourceManager. - If there is enough resources, the
JobManagercreate anExecutionGraphwhich represents thephysical dataflowof the application (how the logical dataflow will be executed). It then sends theExecutionGraphto theTaskManagers. - The
TaskManagersexecute the tasks of the job and communicate with each other to exchange data between tasks. - The
JobManagercontinuously monitors the progress of the job and reports the status back to theFlink clientvia theDispatcher.
Apache Flink is designed to be fault-tolerant and provides mechanisms for handling failures, such as checkpointing and state recovery. In case of a failure, Flink can recover the state of the job and resume processing from the last successful checkpoint.
Flink concepts
Flink DataStream API
The DataStream API is a high-level API for building stream processing applications in Apache Flink. It provides a set of operators that can be used to process data streams, such as map, filter, reduce, join, and window. The DataStream API is designed to be easy to use and provides a rich set of features for building complex stream processing applications.
Flink State
Flink provides a stateful stream processing model that allows you to maintain state across multiple events in a data stream. This is useful for applications that need to keep track of stateful information, such as counts, averages, and aggregations. Flink provides several types of state that can be used to store stateful information, such as ValueState (we will be using this in our demo, while joining streams), ListState, MapState, and ReducingState.
Flink Windows
Windows are a key concept in stream processing applications that allow you to group events into time-based or count-based windows and apply operations on the events within each window. Flink provides several types of windows that can be used to group events, such as Tumbling Windows, Sliding Windows, Session Windows, and Global Windows.
Flink Connectors
Flink provides support for a wide range of connectors that can be used to read (from Sources) and write (to Sinks) data from external systems, such as Apache Kafka, Apache Cassandra, Amazon S3, and Elasticsearch, etc ... Flink provides a rich set of connectors that can be used to integrate with different data sources and sinks.
Building the demo application
Prerequisites
- Java 17 or higher.
- Apache Flink 1.18.1.
- Apache Kafka.
Project setup
First, we need to create a new Maven project and add the necessary dependencies for Apache Flink and Kafka. You can create a new Maven project using the following command:
mvn archetype:generate                \
  -DarchetypeGroupId=org.apache.flink   \
  -DarchetypeArtifactId=flink-quickstart-java \
  -DarchetypeVersion=1.18.1
This will prompt you an interactive shell where you can provide the necessary information for your project.
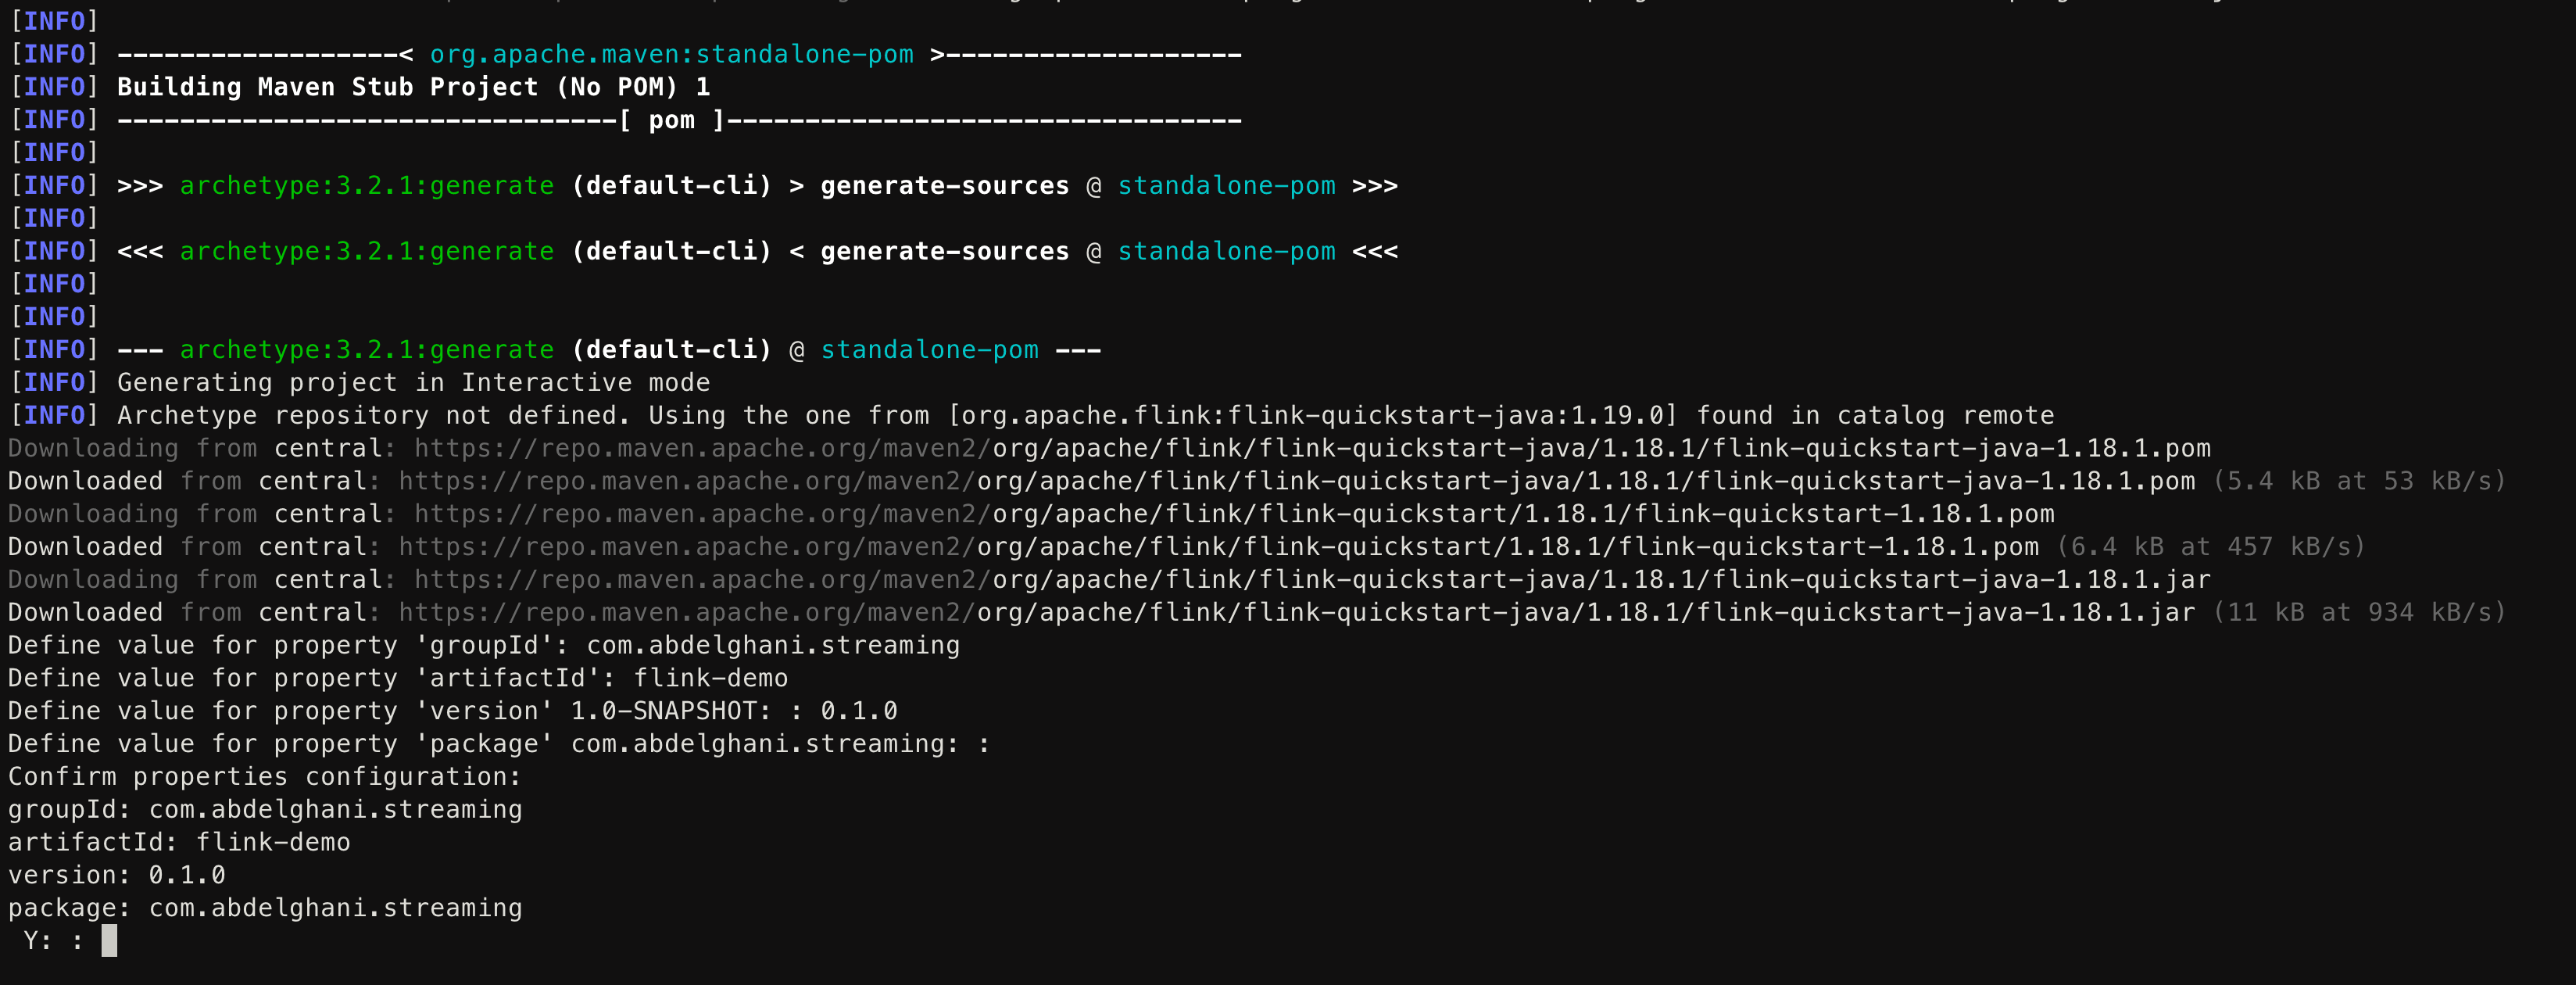
Please note that we will note use the latest Flink version 1.19.0 because the Kafka connector is not yet available, at the time of writing this article.
Once finished go import your project in your favorite IDE.
Adding dependencies
Make sure to add the following dependencies to your pom.xml file:
<properties>
	<project.build.sourceEncoding>UTF-8</project.build.sourceEncoding>
	<flink.version>1.18.1</flink.version>
	<target.java.version>17</target.java.version>
	<maven.compiler.source>${target.java.version}</maven.compiler.source>
	<maven.compiler.target>${target.java.version}</maven.compiler.target>
	<maven-compiler.version>3.1</maven-compiler.version>
	<lombok.version>1.18.32</lombok.version>
</properties>

<dependencies>
		<!-- Apache Flink dependencies -->
		<!-- These dependencies are provided, because they should not be packaged into the JAR file. -->
		<dependency>
			<groupId>org.apache.flink</groupId>
			<artifactId>flink-java</artifactId>
			<version>${flink.version}</version>
			<scope>provided</scope>
		</dependency>
		<dependency>
			<groupId>org.apache.flink</groupId>
			<artifactId>flink-core</artifactId>
			<version>${flink.version}</version>
			<scope>provided</scope>
		</dependency>
		<dependency>
			<groupId>org.apache.flink</groupId>
			<artifactId>flink-connector-base</artifactId>
			<version>${flink.version}</version>
			<scope>provided</scope>
		</dependency>
		<dependency>
			<groupId>org.apache.flink</groupId>
			<artifactId>flink-streaming-java</artifactId>
			<version>${flink.version}</version>
			<scope>provided</scope>
		</dependency>
		<dependency>
			<groupId>org.apache.flink</groupId>
			<artifactId>flink-clients</artifactId>
			<version>${flink.version}</version>
			<scope>provided</scope>
		</dependency>
		<dependency>
			<groupId>org.apache.flink</groupId>
			<artifactId>flink-shaded-guava</artifactId>
			<version>31.1-jre-17.0</version>
		</dependency>

		<!-- Add connector dependencies here. They must be in the default scope (compile). -->
		<dependency>
			<groupId>org.apache.flink</groupId>
			<artifactId>flink-connector-kafka</artifactId>
			<version>3.1.0-1.18</version>
		</dependency>
		<dependency>
			<groupId>org.apache.kafka</groupId>
			<artifactId>kafka-clients</artifactId>
			<version>3.4.0</version>
		</dependency>

		<!-- Add logging framework, to produce console output when running in the IDE. -->
		<!-- These dependencies are excluded from the application JAR by default. -->
		<dependency>
			<groupId>org.projectlombok</groupId>
			<artifactId>lombok</artifactId>
			<version>${lombok.version}</version>
			<scope>provided</scope>
		</dependency>

		<dependency>
			<groupId>org.slf4j</groupId>
			<artifactId>slf4j-api</artifactId>
			<version>2.0.12</version>
		</dependency>
		<dependency>
			<groupId>ch.qos.logback</groupId>
			<artifactId>logback-classic</artifactId>
			<version>1.5.3</version>
			<scope>runtime</scope>
		</dependency>
	</dependencies>
The flink-clients dependency is used to run the job from the IDE. It is not included in the JAR file when building the project.
Changing the main class
Please note that you can change the entrypoint of the application, which is the class that contains the main method, by changing themainClass property in the maven-shade-plugin configuration in the pom.xml file:<plugin>
<groupId>org.apache.maven.plugins</groupId>
<artifactId>maven-shade-plugin</artifactId>
<version>3.1.1</version>
<executions>
<!-- Run shade goal on package phase -->
<execution>
<phase>package</phase>
<goals>
<goal>shade</goal>
</goals>
<configuration>
<createDependencyReducedPom>false</createDependencyReducedPom>
<!--> other setup here <-->
<transformers>
<transformer implementation="org.apache.maven.plugins.shade.resource.ServicesResourceTransformer"/>
<transformer implementation="org.apache.maven.plugins.shade.resource.ManifestResourceTransformer">
<mainClass>com.abdelrani.stockstreams.DataStreamJob</mainClass> <!-- Change this to your main class -->
</transformer>
</transformers>
</configuration>
</execution>
</executions>
</plugin>
Logging configuration
We will be using logback for logging, create a logback.xml file in the src/main/resources directory with the following content (make sure to change the package name):
<?xml version="1.0" encoding="UTF-8"?>
<configuration>

    <appender name="CONSOLE" class="ch.qos.logback.core.ConsoleAppender">
        <layout class="ch.qos.logback.classic.PatternLayout">
            <Pattern>
                %d{HH:mm:ss.SSS} [%t] %-5level %logger{36} - %msg%n
            </Pattern>
        </layout>
    </appender>

	<!-- Change this to your package name -->
    <logger name="com.abdelrani" level="debug" additivity="false">
        <appender-ref ref="CONSOLE"/>
    </logger>

    <root level="error">
        <appender-ref ref="CONSOLE"/>
    </root>

</configuration>
Testing our setup
Let's first define our first job pipeline that takes a message as input and prints it to the console.
public class DataStreamJob {

	public static void main(String[] args) throws Exception {
		// Sets up the execution environment, which is the main entry point to building Flink applications.
		final StreamExecutionEnvironment env = StreamExecutionEnvironment.getExecutionEnvironment();

		env.fromElements("Hello, World!").print();

		// Execute program, beginning computation.
		env.execute("Starting the stock price updates job ...");
	}
}
If you run the application, you will get the following error:
Exception in thread "main" java.lang.NoClassDefFoundError: org/apache/flink/streaming/api/environment/StreamExecutionEnvironment
	at com.abdelrani.stockstreams.DataStreamJob.main(DataStreamJob.java:28)
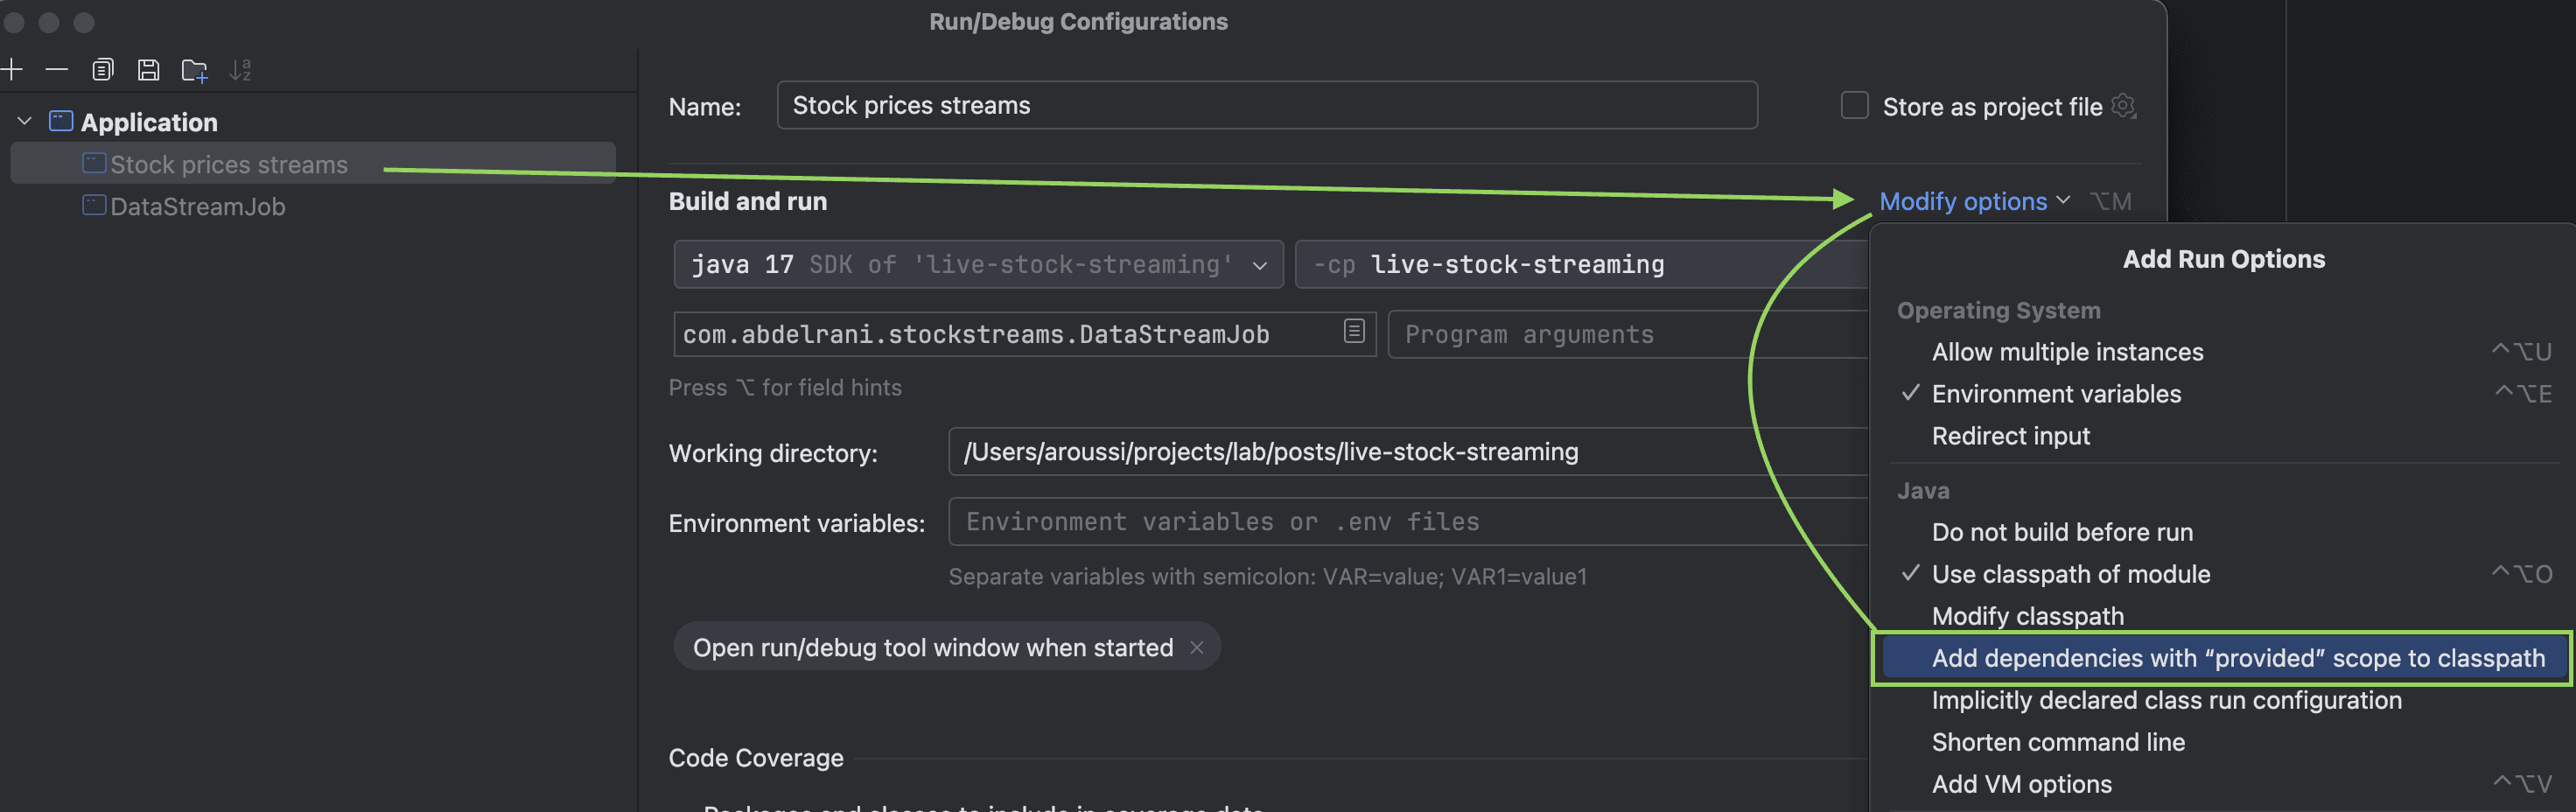
This is because you need to enable the Add dependencies with "provided" scope to the classpath option in the run configuration of your IDE. This will add the dependencies with the provided scope to the classpath when running the application.
Java 17 compatibility issue
Later on during the development, you could also face this error: Unable to make field private final java.lang.Object[] java.util.Arrays$ArrayList.a accessible.
This is because of the new restrictions in Java 17, you can fix this by going to Run > Edit Configurations > Add VM options and adding the following VM options: --add-opens java.base/java.util=ALL-UNNAMED --add-opens java.base/java.lang=ALL-UNNAMED.
Your final Run configuration should look like this:
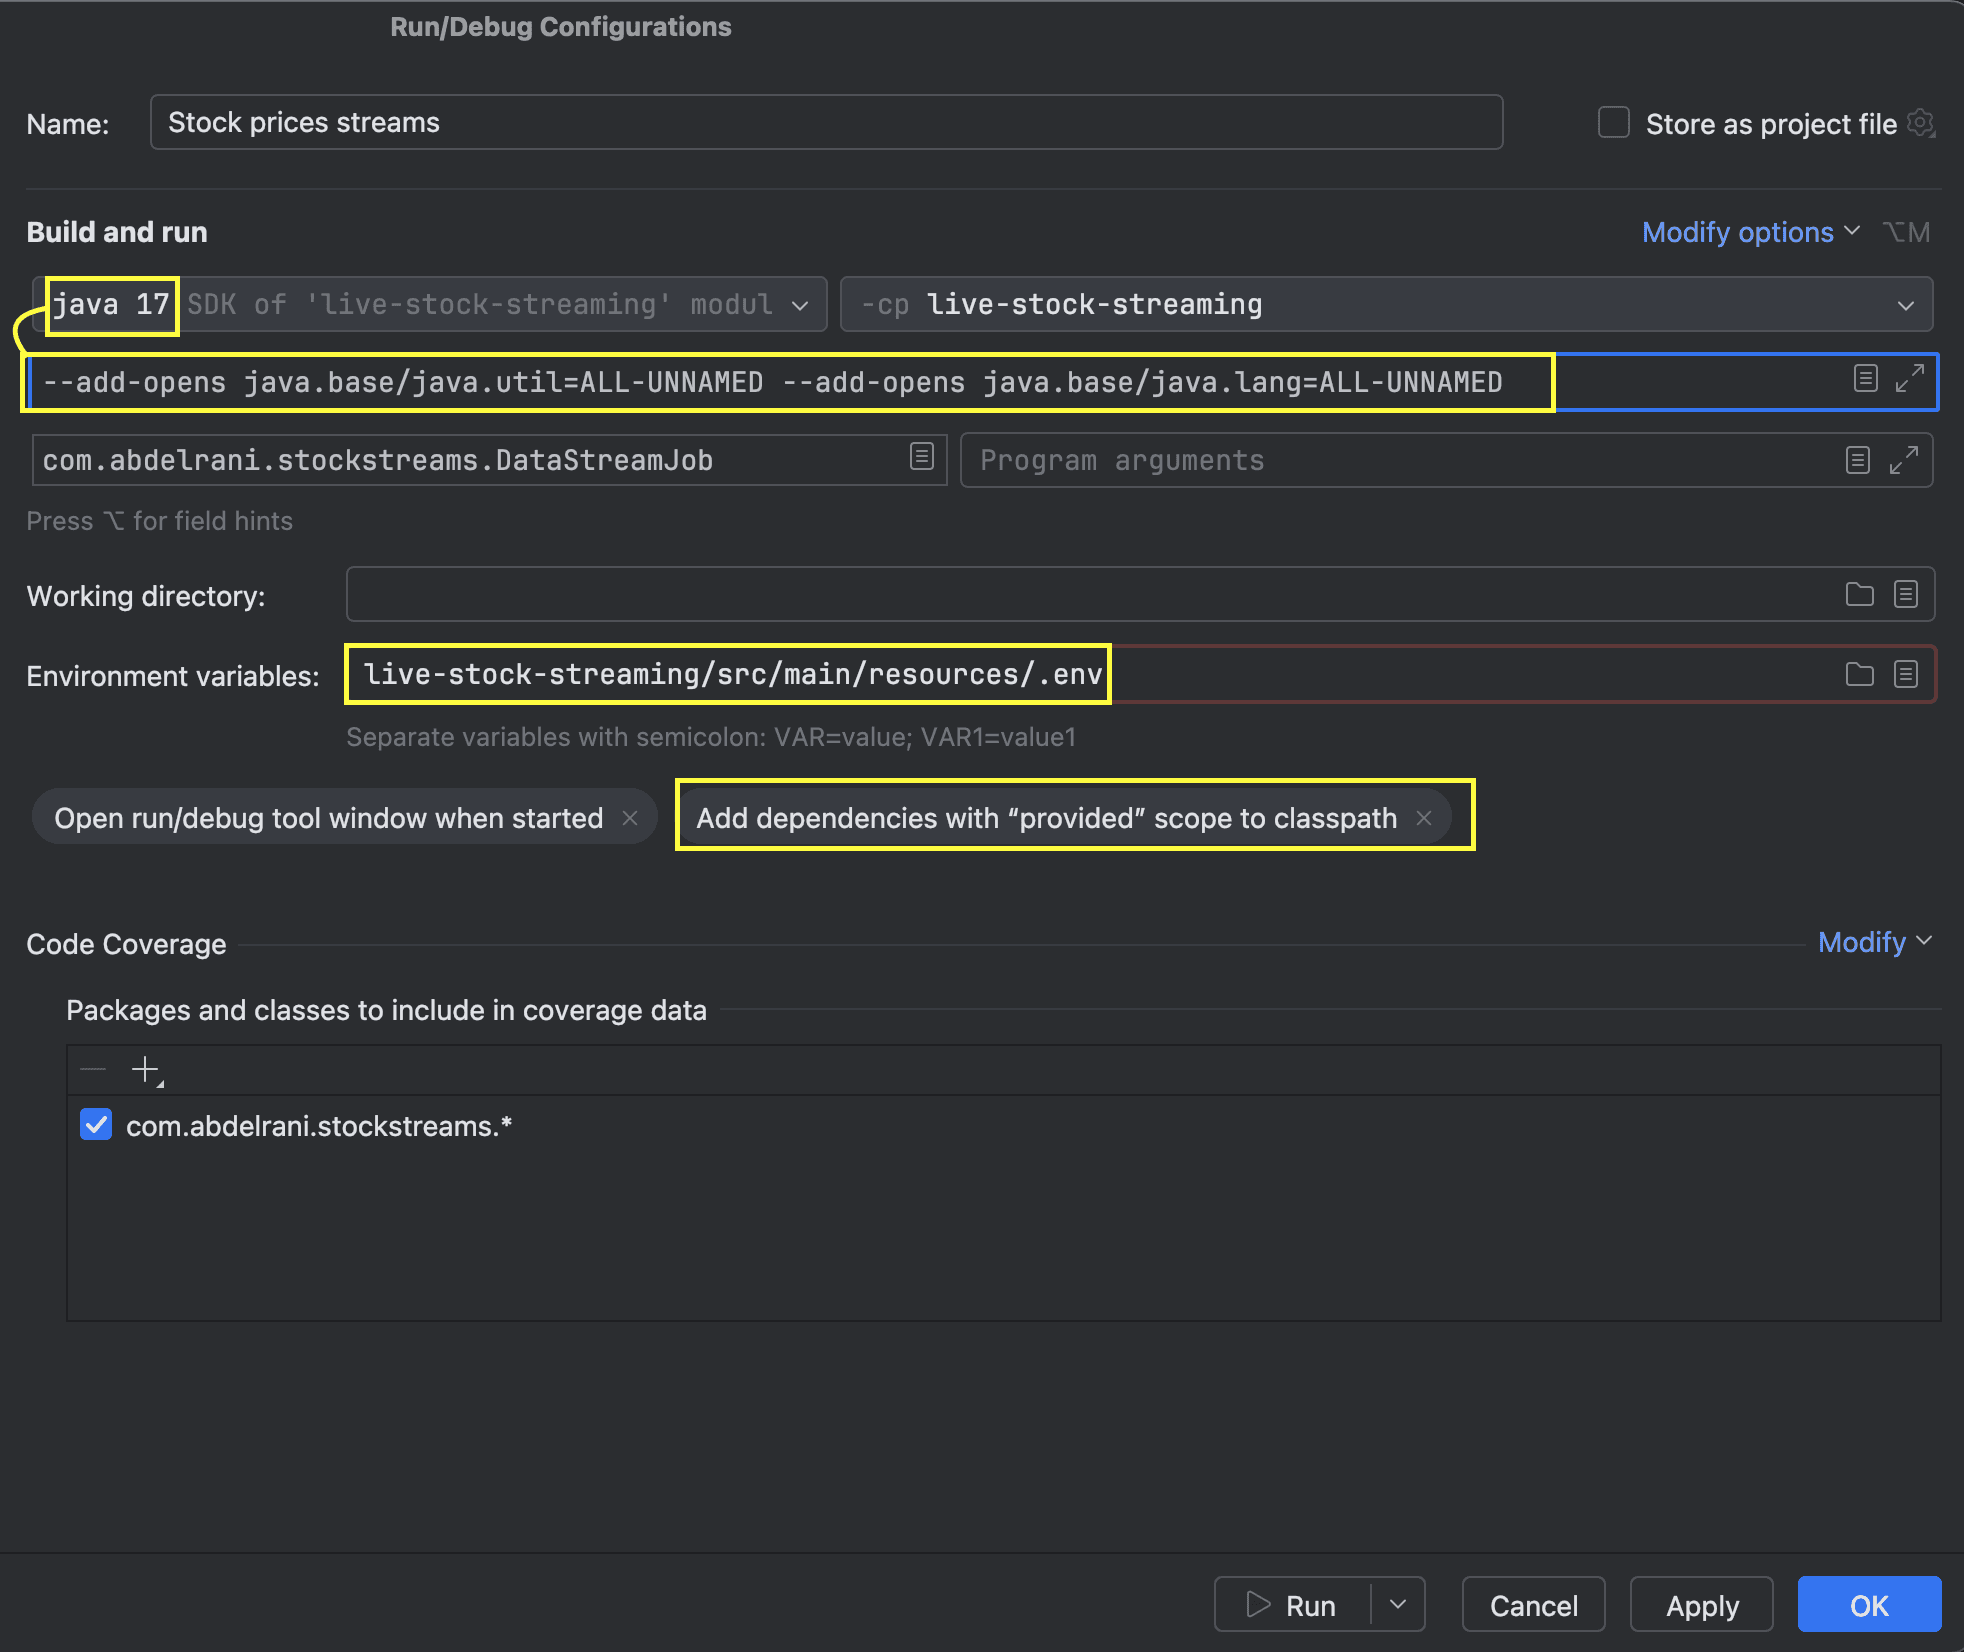
The problem could be also fixed by downgrading the Java version to 11 or 8 (for demoing).
and if you run this little main class again you will see the following output in the console:
.......... some logs here ..........

5> Hello World!
Great 🎉, now we can start building our job.
Reading properties from environment variables
Since we are not using spring boot or any other framework that will perform the heaving lifting of loading properties for us, let's do it ourself and define a Property class that will represent kafka properties.
KafkaProperties.java@Data
@Builder
public class KafkaProperties {
private String bootstrapServers;
private String topic;
private String groupId;
private String clientId;
private String autoOffsetReset;
}
Then we will define a loader that will load and provide the kafka consumers properties:
PropertiesLoader.javapublic class PropertiesLoader {
private static final Map<String, String> ENVS = System.getenv();
public KafkaProperties priceKafkaProperties() {
return KafkaProperties.builder()
.bootstrapServers(ENVS.get("PRICE_KAFKA_BOOTSTRAP_SERVERS"))
.topic(ENVS.get("PRICE_KAFKA_TOPIC"))
.groupId(ENVS.get("PRICE_KAFKA_GROUP_ID"))
.clientId(ENVS.get("PRICE_KAFKA_CLIENT_ID"))
.autoOffsetReset(ENVS.get("PRICE_KAFKA_AUTO_OFFSET_RESET"))
.build();
}
public KafkaProperties stockKafkaProperties() {
return KafkaProperties.builder()
.bootstrapServers(ENVS.get("STOCK_KAFKA_BOOTSTRAP_SERVERS"))
.topic(ENVS.get("STOCK_KAFKA_TOPIC"))
.groupId(ENVS.get("STOCK_KAFKA_GROUP_ID"))
.clientId(ENVS.get("STOCK_KAFKA_CLIENT_ID"))
.autoOffsetReset(ENVS.get("STOCK_KAFKA_AUTO_OFFSET_RESET"))
.build();
}
public KafkaProperties stockUpdateKafkaProperties() {
return KafkaProperties.builder()
.bootstrapServers(ENVS.get("STOCK_UPDATE_KAFKA_BOOTSTRAP_SERVERS"))
.topic(ENVS.get("STOCK_UPDATE_KAFKA_TOPIC"))
.autoOffsetReset(ENVS.get("STOCK_UPDATE_KAFKA_AUTO_OFFSET_RESET"))
.build();
}
}
and finaly define a .env file that will contains the properties:
# Price config
PRICE_KAFKA_BOOTSTRAP_SERVERS=localhost:9092
PRICE_KAFKA_TOPIC=price
PRICE_KAFKA_GROUP_ID=price_group
RICE_KAFKA_CLIENT_ID=price_client
PRICE_KAFKA_AUTO_OFFSET_RESET=latest

#Stock config
STOCK_KAFKA_BOOTSTRAP_SERVERS=localhost:9092
STOCK_KAFKA_TOPIC=stock
STOCK_KAFKA_GROUP_ID=stock_group
STOCK_KAFKA_CLIENT_ID=stock_client
STOCK_KAFKA_AUTO_OFFSET_RESET=latest

# Stock price updates config
STOCK_UPDATE_KAFKA_BOOTSTRAP_SERVERS=localhost:9092
STOCK_UPDATE_KAFKA_TOPIC=stock_update
STOCK_UPDATE_KAFKA_AUTO_OFFSET_RESET=latest
If you are using IntelliJ IDEA, you can add the .env file to the Run/Debug Configurations by going to Run > Edit Configurations > Environment Variables and add the path to the .env file. Otherwise make sure to define the environment variables in your system, before starting the application.
Defining the Kafka consumers and producers
For the purpose of this demo, I've grouped the consumers (a.k.a sources in Flink) and the producer (sink) in a single class.
SourceBuilder.javapublic class SourceBuilder {
public static KafkaSource<Price> priceSource(KafkaProperties kafkaProperties) {
return KafkaSource.<Price>builder()
.setBootstrapServers(kafkaProperties.getBootstrapServers())
.setTopics(kafkaProperties.getTopic())
.setValueOnlyDeserializer(new PriceDeserializer())
.setGroupId(kafkaProperties.getGroupId())
.setStartingOffsets(OffsetsInitializer.committedOffsets(OffsetResetStrategy.EARLIEST))
.build();
}
public static KafkaSource<Stock> stockSource(KafkaProperties kafkaProperties) {
return KafkaSource.<Stock>builder()
.setBootstrapServers(kafkaProperties.getBootstrapServers())
.setTopics(kafkaProperties.getTopic())
.setDeserializer(new StockDeserializer())
.setGroupId(kafkaProperties.getGroupId())
.setStartingOffsets(OffsetsInitializer.committedOffsets(OffsetResetStrategy.EARLIEST))
.setProperty("partition.discovery.interval.ms", "10000") // discover new partitions per 10 seconds
.build();
}
public static KafkaSink<StockUpdate> stockUpdateSink(KafkaProperties kafkaProperties) {
return KafkaSink.<StockUpdate>builder()
.setBootstrapServers(kafkaProperties.getBootstrapServers())
.setRecordSerializer(new StockUpdateSerializer(kafkaProperties.getTopic()))
.setDeliveryGuarantee(DeliveryGuarantee.AT_LEAST_ONCE) // at least once delivery
.build();
}
}
Please note that for the producer we used the
AT_LEAST_ONCEdelivery guarantee. You can also use theEXACTLY_ONCEdelivery guarantee if you want to ensure that each message is delivered exactly once but this will require the support of transaction in the Kafka cluster.
Deserializers for consumers
ThePriceDeserializer and StockDeserializer are custom deserializers that will be used to deserialize the messages from the Kafka topics.There are multiple ways to implement a customer deserializer in Flink, but for this demo, we will demonstrate 2 ways:
- The first one is to implement the
KafkaRecordDeserializationSchemainterface (when using kafka). - The second is more general, and works with any source, you need to extends the
AbstractDeserializationSchemaclass.
@Slf4j
public class StockDeserializer implements KafkaRecordDeserializationSchema<Stock> {

    @Override
    public void deserialize(ConsumerRecord<byte[], byte[]> record, Collector<Stock> out) throws IOException {
        Stock message = MAPPER.readValue(record.value(), Stock.class);
        if (log.isDebugEnabled()) {
           log.debug("Received stock with symbol: {}", message.getSymbol());
        }
       out.collect(message);
    }

    @Override
    public TypeInformation<Stock> getProducedType() {
        return TypeInformation.of(Stock.class);
    }
}
@Slf4j
public class PriceDeserializer extends AbstractDeserializationSchema<Price>  {

    @Override
    public Price deserialize(byte[] message) throws IOException {
        Price priceMessage = MAPPER.readValue(message, Price.class);
        if (log.isDebugEnabled()) {
            log.debug("Received price message for stock: {}", priceMessage.getSymbol());
        }
        return priceMessage;
    }

}
Serializer for the producer
For the producer, we use a Custom Serializer that will serialize the message to byte array before sending it to the Kafka topic, for that we implement theKafkaRecordSerializationSchema interface.StockUpdateSerializer.javapublic class StockUpdateSerializer implements KafkaRecordSerializationSchema<StockUpdate> {
private final String topic;
public StockUpdateSerializer(String topic) {
this.topic = topic;
}
@SneakyThrows
@Nullable
@Override
public ProducerRecord<byte[], byte[]> serialize(StockUpdate element, KafkaSinkContext context, Long timestamp) {
byte[] key = element.getSymbol().getBytes();
byte[] result = MAPPER.writeValueAsBytes(element);
return new ProducerRecord<>(topic, key, result);
}
}
You've probably noticed that we are using a MAPPER object constant to deserialize the message, this is because we are using Jackson as the JSON deserializer. So you need to add the following class configuration :
public class JacksonConfiguration {

    public static final ObjectMapper MAPPER = defaultObjectMapper();


    private static ObjectMapper defaultObjectMapper() {
        return JsonMapper.builder()
                .addModules(new JavaTimeModule(), new Jdk8Module())
                .serializationInclusion(NON_NULL)
                .serializationInclusion(NON_EMPTY)
                .propertyNamingStrategy(new PropertyNamingStrategies.SnakeCaseStrategy())
                .enable(SerializationFeature.ORDER_MAP_ENTRIES_BY_KEYS)
                .enable(DeserializationFeature.ACCEPT_SINGLE_VALUE_AS_ARRAY)
                .enable(DeserializationFeature.UNWRAP_SINGLE_VALUE_ARRAYS)
                .disable(SerializationFeature.FAIL_ON_EMPTY_BEANS)
                .disable(DeserializationFeature.FAIL_ON_UNKNOWN_PROPERTIES)
                .disable(DeserializationFeature.ADJUST_DATES_TO_CONTEXT_TIME_ZONE)
                .disable(SerializationFeature.WRITE_DATES_AS_TIMESTAMPS).build();
    }
}
Once our consumers (connectors part) are defined, we can now move to the processing part.
Defining the joining strategy
We will join the data from the 2 Kafka topics using the connect method provided by the DataStream API. The connect method allows you to connect two streams together and apply a transformation on the connected streams.
public class StockPriceJoiner extends RichCoFlatMapFunction<Stock, Price, StockUpdate> {

    /**
     * The state that is maintained by this process function
     */
    private ValueState<Price> priceState;

    @Override
    public void open(Configuration parameters) throws Exception {
        priceState = getRuntimeContext().getState(new ValueStateDescriptor<>("price", Price.class));
    }

    @Override
    public void flatMap1(Stock stock, Collector<StockUpdate> out) throws Exception {
        Price price = priceState.value();
        if (price != null) {
            out.collect(StockUpdate.builder()
                    .symbol(stock.getSymbol())
                    .price(price.getPrice())
                    .companyName(stock.getCompanyName())
                    .timestamp(price.getTimestamp())
                    .build());
        }
    }

    @Override
    public void flatMap2(Price value, Collector<StockUpdate> out) throws Exception {
        priceState.update(value);
    }
}
The OfferJoinerFunction class extends RichCoFlatMapFunction, which is a function that takes two input streams and produces a single output stream. The flatMap1 method is called for each element in the first input stream, and the flatMap2 method is called for each element in the second input stream. In this case, we are joining the data from the two input streams and producing a single output stream.
Defining the main class
This is the main class that will trigger the execution of the Flink job. You can use the class generated by the Maven archetype or create a new one which will contains main method.
DataStreamJob.java@Slf4j
public class DataStreamJob {
private static final Set<String> ALLOWED_STOCKS = Set.of("AAPL", "GOOG", "AMZN", "MSFT", "TSLA");
public static void main(String[] args) throws Exception {
// Sets up the execution environment, which is the main entry point to building Flink applications.
final StreamExecutionEnvironment env = StreamExecutionEnvironment.getExecutionEnvironment();
// Configure the environment
configureEnvironment(env);
// loading properties
PropertiesLoader propertiesLoader = new PropertiesLoader();
// Creating the execution plan
DataStreamSource<Stock> stockDataStream = env.fromSource(SourceBuilder.stockSource(propertiesLoader.stockKafkaProperties()),
WatermarkStrategy.forMonotonousTimestamps(),
"stock-source");
DataStreamSource<Price> priceDataStream = env.fromSource(SourceBuilder.priceSource(propertiesLoader.priceKafkaProperties()),
WatermarkStrategy.forMonotonousTimestamps(),
"price-source");
// send the result to a kafka topic using KafkaSink
KafkaSink<StockUpdate> stockUpdateKafkaSink = SourceBuilder.stockUpdateSink(propertiesLoader.stockUpdateKafkaProperties());
stockDataStream
.filter(stock -> ALLOWED_STOCKS.contains(stock.getSymbol()))
.connect(priceDataStream)
.keyBy(Stock::getSymbol, Price::getSymbol)
.flatMap(new StockPriceJoiner())
.name("join-stock-price")
.map(stockUpdate -> {
log.info("stock price update sent to kafka: {}", stockUpdate);
return stockUpdate;
})
.sinkTo(stockUpdateKafkaSink);
// Execute program, beginning computation.
env.execute("StockPriceStreamJob");
}
private static void configureEnvironment(StreamExecutionEnvironment env) {
// automatically recover from failures
env.setRestartStrategy(RestartStrategies.fixedDelayRestart(
3, // number of restart attempts
Time.seconds(10) // delay
));
// disable kryo serialization and use the PojoSerializer (for better efficiency)
env.getConfig().disableGenericTypes();
// configuring the task manager
env.configure(getConfiguration());
}
// Configure the task manager
private static Configuration getConfiguration() {
Configuration config = new Configuration();
config.setString("taskmanager.cpu.cores", "4");
config.setString("taskmanager.memory.task.heap.size", "1024m");
return config;
}
}
Running the Flink job
There are 2 ways to run our demo application, the first one is to run it from the IDE (thanks to the flink-clients library) and the second one is to build a JAR file and submit it to a Flink cluster.
Running the job from the IDE
Before you run the job, ensure that you have created the topics located in the .env file.
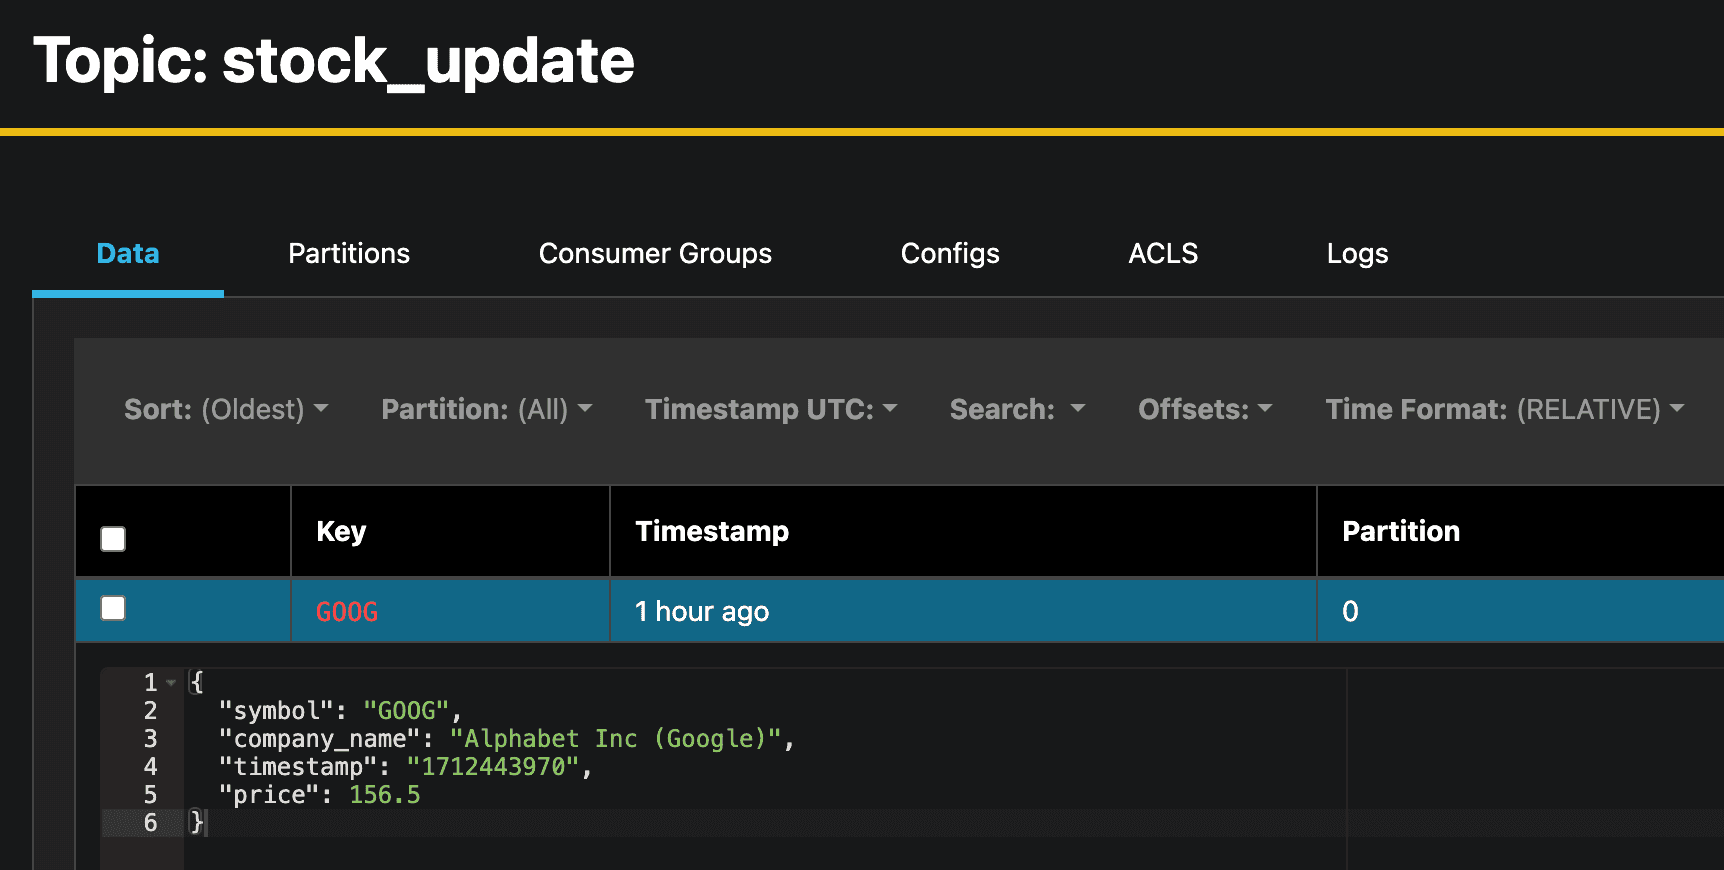
Then run the main function and send some messages to the Kafka topics. You should see output similar to the following:

As you can see we are receiving the stock and price messages from the Kafka topics, filtering the stocks that are not in the ALLOWED_STOCKS list (as an example here the NVDA stock were not processed since the STOCK symbol doesn't exist in the ALLOWED_STOCKS set), joining the stock and price messages, and sending the result to the stock_update Kafka topic.
Submitting the job to the Flink cluster
This part will be a bit more tricky, and as so we will see it together in the next article 😉 ...
I hope you enjoyed this article, and that you learned something new about Apache Flink and how to build real-time data streaming applications using Flink and Kafka.
In the next article, we will see how to setup a cluster in Local and Kubernetes and how to submit the job to the Flink cluster and how to monitor the job using the Flink web interface.
Until then, Happy learning 🚀.